Why One Faucet Has Low Water Pressure and How to Fix It
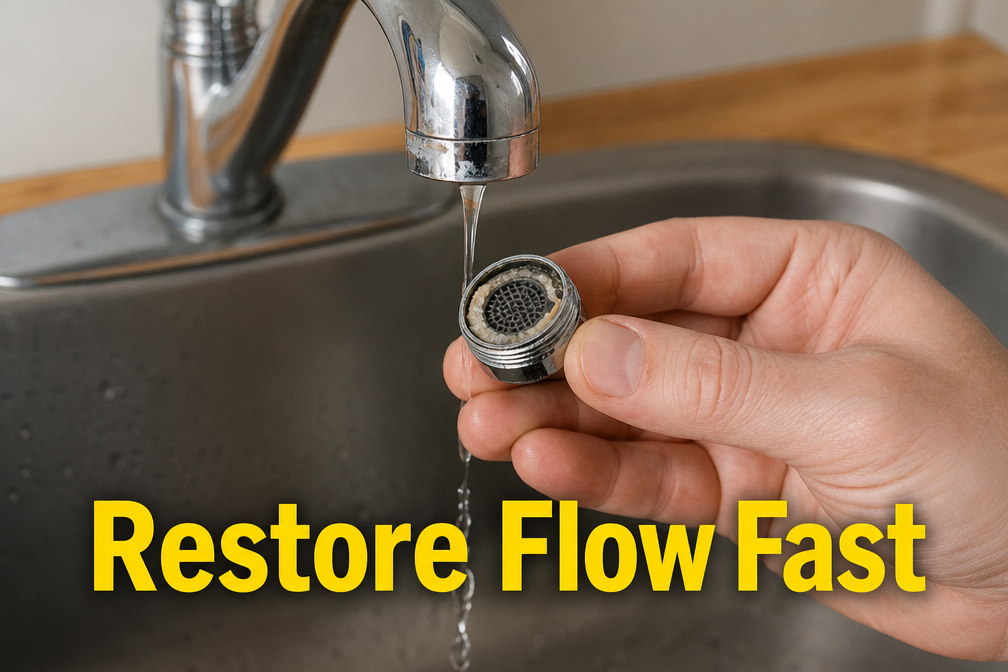
Direct answer: When only a single faucet shows weak flow, the problem is almost always a clogged aerator, a partially closed shut‑off valve, a worn cartridge, or a kinked supply line. Start by checking the aerator – it resolves 60‑70% of cases – and then move through the other items in order of likelihood.
Confirm the Issue Is Isolated
Before you begin any disassembly, verify that the low pressure is limited to one fixture:
- Turn on the faucet and note the flow of both hot and cold water.
- Open a nearby faucet (sink, shower, or tub) and compare the pressure.
- If other fixtures work normally, you can focus on the single faucet. If several fixtures are weak, the cause is likely a house‑wide issue such as a pressure‑reducing valve (PRV) or a municipal supply dip.
Common Causes (Ordered by Likelihood)
Clogged Aerator (Most Frequent)
The aerator is the fine mesh screen at the tip of the faucet. Mineral deposits, sand, or debris can block it, reducing flow dramatically.
Partially Closed or Faulty Shut‑off Valve
Under‑sink shut‑off valves are quarter‑turn ball valves. If they are not fully open or the internal seat is corroded, water cannot pass freely.
Worn or Clogged Faucet Cartridge
Modern single‑handle faucets use a cartridge to mix hot and cold water. Over time the internal passages can become coated with mineral buildup or the cartridge can wear out.
Kinked or Corroded Supply Line
Flexible supply lines can develop kinks or the metal braiding can rust, especially in older homes with galvanized piping.
System‑Wide Issues (Rare for a Single Fixture)
Problems such as a failing PRV, a water main break, or a municipal pressure drop affect all fixtures. These are only relevant if multiple faucets are weak.
Repair vs. Replace: Decision Guide
Use the table below to decide whether a repair is worth the effort or if a full faucet replacement is more economical.
| Condition | Repair Cost | Replacement Cost | Recommended Action |
|---|---|---|---|
| Clogged aerator only | $5‑$15 (aerator kit) | $30‑$80 (new faucet) | Repair |
| Faulty valve (simple turn) | $0‑$10 (valve adjustment) | $30‑$70 (new valve) | Repair |
| Cartridge worn out | $10‑$25 (cartridge) | $80‑$250 (new faucet) | Repair if faucet is high‑end; replace otherwise |
| Severe corrosion or repeated leaks | $50‑$100 (parts + labor) | $150‑$300 (new faucet) | Replace |
Step‑by‑‑Fixes
Gather these basic tools before you start: adjustable wrench, slip‑joint pliers, screwdriver (flat‑head & Phillips), a small bucket, plumber’s tape, and a soft brush or old toothbrush.
1. Clean or Replace the Aerator
- Turn off both hot and cold shut‑off valves under the sink.
- Unscrew the aerator counter‑clockwise. If it is stuck, wrap a rubber jar opener around it for extra grip.
- Disassemble the aerator (usually three parts: housing, screen, and flow restrictor).
- Rinse each component in white vinegar for 10‑15 minutes to dissolve mineral deposits.
- Use a soft brush to scrub away remaining debris.
- Re‑assemble and screw the aerator back on. Turn the valves back on and test the flow.
- If flow is still low, replace the aerator with a new one that matches the faucet’s thread size (most U.S. faucets use 15‑32 threads).
2. Verify Shut‑off Valves Are Fully Open
- Locate the two quarter‑turn valves under the sink (cold on the left, hot on the right).
- Turn each valve fully counter‑clockwise. A fully open valve aligns the slot with the pipe.
- If the valve feels stiff or does not turn fully, gently tap it with a rubber mallet to free a stuck seat.
- Run water; if pressure improves, the issue was a partially closed valve.
- If the valve is corroded or leaks after opening, replace it with a new ½‑inch ball valve.
3. Replace a Faulty Cartridge
- With the shut‑off valves closed, remove the faucet handle. This usually requires loosening a set screw hidden under a decorative cap.
- Depending on the faucet model, you may need to remove a retaining nut (use an adjustable wrench).
- Pull the cartridge straight out. Note its orientation for re‑installation.
- Inspect the cartridge for mineral buildup or broken O‑rings. If any damage is visible, purchase the exact replacement part (model number is often stamped on the cartridge).
- Insert the new cartridge, replace the retaining nut, and re‑attach the handle.
- Open the shut‑off valves and test both hot and cold flow.
4. Fix a Kinked or Corroded Supply Line
- Turn off the shut‑off valves and place a bucket beneath the line.
- Disconnect the supply line from the faucet using pliers. If the line is threaded, unscrew it; if it uses a quick‑connect, press the release collar.
- Inspect the line for kinks, cracks, or corrosion. A kink can be straightened, but any visible damage requires replacement.
- Install a new supply line (commonly ½‑inch compression or braided stainless steel). Wrap plumber’s tape on the male threads before tightening.
- Reconnect, turn the valves back on, and check for leaks and pressure.
Cost, Time, and Difficulty Overview
- Clogged aerator: $5‑$15 parts, 10‑15 minutes, easy.
- Valve adjustment: $0‑$10 (no parts), 5‑10 minutes, easy.
- Cartridge replacement: $10‑$25 parts, 20‑30 minutes, moderate (requires faucet disassembly).
- Supply line repair: $5‑$20 parts, 15‑25 minutes, moderate.
- Full faucet replacement: $80‑$250, 45‑90 minutes (including removal of old faucet), moderate‑hard if plumbing connections are tight.
When to Call a Professional
Even experienced DIYers should stop and call a licensed plumber if any of the following occur:
- Water continues to drip from the shut‑off valve after tightening.
- Supply lines are made of galvanized steel and show extensive corrosion.
- The faucet is part of a wall‑mounted or concealed installation that requires cutting into drywall.
- You encounter a pressure‑reducing valve (PRV) that appears to be the source of a house‑wide pressure drop.
- Local code requires a permit for the type of work you are performing (e.g., replacing a main shut‑off valve).
Common Mistakes to Avoid
- Using excessive force on a stuck aerator, which can strip the threads.
- Neglecting to turn off both hot and cold shut‑off valves before disassembling the faucet, leading to sudden water spray.
- Re‑using old plumber’s tape on new connections; always use fresh tape.
- Skipping a final leak check after re‑assembly; a small drip can cause water damage over time.
- Assuming a low‑flow faucet is the cause; many modern faucets are deliberately low‑flow for water‑saving, so compare against the manufacturer’s specifications.
FAQ
Can a clogged aerator cause no water at all?
Yes. If the screen is completely blocked, the flow can be reduced to a trickle or stop entirely.
What if the faucet has a pull‑out sprayer?
Pull‑out sprayers have an additional hose and a separate aerator. Clean both the main aerator and the sprayer’s aerator; the sprayer hose can also develop kinks.

Is it safe to use chemical descalers on the aerator?
Most manufacturers recommend vinegar or a mild descaling solution. Harsh acids can damage brass components.
How often should I clean my faucet aerator?
In hard‑water areas, clean the aerator every 6‑12 months. In soft‑water regions, once a year is sufficient.
Will replacing a single faucet affect my home’s overall water pressure?
No. The fix is localized; overall house pressure remains unchanged unless you discover a system‑wide issue.


Comments
Post a Comment