How to Stop a Running Toilet: Four Checks Before Calling a Plumber
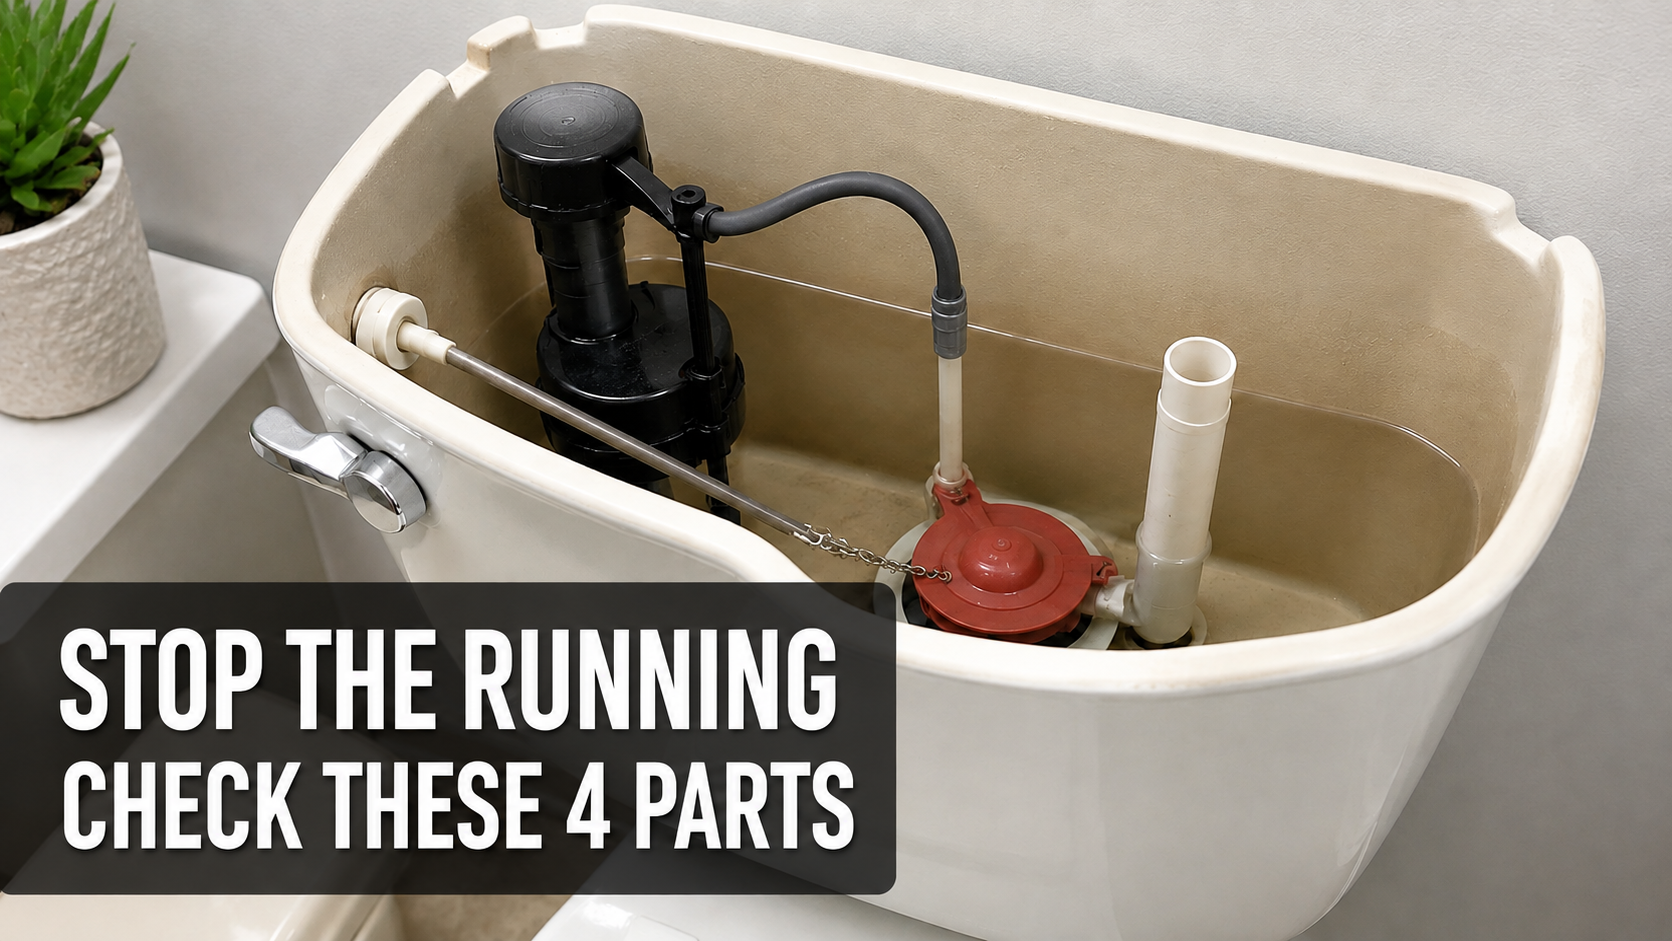
A running toilet usually comes down to one of four things: a leaking flapper or canister seal, a float set too high, a fill valve that does not shut off, or a handle and chain that keep the seal open. Watch one complete flush before buying parts; the path of the water points to the part that needs attention.
Key Takeaways
- Water trickling into the bowl while the tank is full usually calls for a seal and chain check.
- Water flowing into the overflow tube points to a high water level or a fill-valve problem.
- Use the shutoff valve and flush to empty the tank before removing or replacing an internal part.
- Match a replacement seal or valve to the toilet model instead of relying on the word “universal.”
How to stop a running toilet: identify the leak path, check the flapper, float, fill valve, and handle, then test the repair before calling a plumber.
Table of Contents
- How to tell why a toilet keeps running
- What to do before opening the toilet tank
- Check the flapper, canister seal, and chain
- Check the water level and fill valve
- Identify the toilet before buying replacement parts
- Retest the toilet after the repair
- When should you call a plumber?
- Frequently Asked Questions
- Key points to remember
- Read the sound and water path
- Prepare without creating a second leak
- Inspect the seal and chain
- Check the water level and fill valve
- Match the correct replacement part
- Retest and avoid common mistakes
- Know when the repair is no longer small
- Check the source notes
How to tell why a toilet keeps running
A running toilet is a toilet that continues to move water after the flush should be complete. The key first distinction is whether tank water is leaking into the bowl or the fill system is sending excess water into the overflow tube.
A brief refill after flushing is normal. A repeated refill when no one has flushed, a steady hiss, or a continuous ripple in the bowl suggests water is still moving. The U.S. Environmental Protection Agency’s WaterSense program notes that household leaks can waste 180 gallons per week and identifies toilets as a frequent source.
- Tank is full but water ripples in the bowl: inspect the flapper or canister seal and the chain.
- Water keeps rising into the overflow tube: check the float setting and whether the fill valve closes.
- The toilet runs after the handle sticks: look for a binding handle arm or chain that prevents the seal from closing.
- Water is outside the tank: stop this internal-tank troubleshooting and locate the external leak.
For a quiet leak, place a few drops of food coloring in the tank and wait without flushing. If color appears in the bowl, water is passing from the tank into the bowl; the test helps distinguish a seal leak from a refill problem. Corinth, Texas, and BookaBuilderUK describe food coloring as a way to detect a toilet leak. Flush after the test to clear the dye. U.S. EPA WaterSense: Fix a Leak Week
What to do before opening the toilet tank
Put a towel on the floor and set the tank lid on a stable, flat surface. Porcelain can crack if the lid falls or is struck, so keep it away from the edge of the counter. Find the water shutoff valve behind or beside the toilet before you begin.
Turn the shutoff gently clockwise to stop the supply. If it will not turn with light pressure, is visibly corroded, or starts leaking around its stem, do not force it. Without a working shutoff, removing a tank component can leave you unable to control the incoming water.
Keep a sponge, a small container, gloves, and a flashlight nearby. First observe one flush with the lid off: note what the handle moves, whether the seal drops back into place, where the water stops, and whether water reaches the overflow tube. Money Talks News also describes shutting off the supply and flushing to empty the tank before removing a flapper.
- Identify the shutoff valve and confirm that it can be turned gently.
- Flush once while watching the handle, chain, seal, float, and water level.
- Close the supply and flush again if you need to work on the seal.
- Use a sponge to remove remaining water before taking a part out.
Check the flapper, canister seal, and chain
The flapper is the flexible seal at the bottom of many toilet tanks; it lifts during a flush and covers the flush-valve opening afterward. Other tanks use a canister or tower seal, so identify the design before shopping. A worn, cracked, distorted, or dirty seal may let tank water seep into the bowl.
With the supply off and the tank mostly empty, look for visible damage, mineral buildup, or debris on the seal and the surface it rests against. Wipe away loose dirt with a soft cloth or sponge, then check whether the seal sits evenly over the opening. A cracked or damaged flush-valve seat may prevent even a new seal from closing properly; the JustAnswer plumbing troubleshooting guide specifically recommends checking the seat for cracks.
Do not assume that every slow leak means the fill valve is defective. A seal that does not close allows water to escape into the bowl, and the fill valve may keep replacing that lost water. If the tank refills intermittently, the seal and its seating surface are a sensible first check.
Make sure the chain does not hold the seal open
Watch the chain as the handle moves. It should lift the seal for the flush and then allow it to settle fully back over the valve opening. A chain that is taut can keep the seal raised; a chain that is too loose can catch under it or tangle with nearby parts.
Adjust the chain connection in small steps, leaving enough slack for the seal to close while keeping the chain clear of the opening. Flush and observe the movement after each adjustment. Trip levers and canister systems differ, so follow the toilet or replacement-part manufacturer’s instructions when the assembly does not use a simple flapper and chain. American Standard: Toilet Keeps Running After Flushing
Check the water level and fill valve
The fill valve replenishes the tank after a flush, and the float signals when to stop filling. If the float is set too high, or the valve does not close, water can continue into the overflow tube. BookaBuilderUK identifies a high water level and a fill valve that struggles to shut off as common causes of continuous running.
Let the tank refill while watching the waterline. It should stop below the top of the overflow tube; use a marked waterline inside the tank when one is provided. If the water reaches the overflow, adjust the float using the adjustment provided on that valve. Avoid bending or forcing plastic parts because float designs vary.
Use the float movement to narrow the cause
While the tank is filling, gently raise the float. If the flow stops, the float setting or movement is likely part of the problem. Adjust it so the valve closes before water reaches the overflow. If lifting the float does not stop the water, close the supply and inspect the valve for visible debris or damage.
Some fill valves can be cleaned, while others need replacement; the method depends on the model. The troubleshooting guide from JustAnswer recommends adjusting the float to prevent overflow and cleaning or replacing the fill valve when needed. Check the manufacturer’s instructions for the valve in your tank before removing its cap or internal parts. Kohler: Toilet Constantly Leaking or Running
| What you observe | First check | Next step |
|---|---|---|
| Color reaches the bowl during the dye test | Flapper or canister seal and its seating surface | Clean loose debris, inspect for wear, and replace a damaged matching seal. |
| Water reaches or enters the overflow tube | Float height and fill valve shutoff | Adjust the float; if the valve still runs, inspect or replace it according to its instructions. |
| Handle stays down or the seal does not settle | Handle arm and chain movement | Remove binding and adjust the chain so the seal can close. |
| Water is outside the tank or around the base | External connection, tank, bowl, or floor area | Stop internal-tank work and assess the leak separately. |
Identify the toilet before buying replacement parts
Toilet tanks do not all use the same seal or fill valve. A familiar hinged flapper, a vertical canister, and other proprietary assemblies may look similar but have different sizes or attachment points. Look for the toilet model information inside the tank, on the fixture, or in the product paperwork, and take a clear photo of the assembly.
Compare the replacement part with the existing design and the manufacturer’s compatibility information. A part that attaches but does not match the valve can close too early, fit poorly, or leave a slow leak. If you cannot identify the model, take the old part or a photo to a plumbing-supply or home-improvement store and check the package’s listed toilet models.
Choose a focused repair when the problem is a worn seal, a chain that catches, a float that is simply set too high, or a fill valve that can be serviced. A replacement toilet is a broader decision if porcelain is cracked or a damaged valve seat cannot be repaired as a separate part. Water around the base can point to a different issue: the plumbing repair guide describes a failed wax ring or damaged floor flange as possible causes, which are outside a tank-seal repair.
Retest the toilet after the repair
Open the shutoff valve slowly and let the tank refill. Watch the first shutoff: the water should stop below the overflow, and the fill valve should not continue hissing or sending water into the tube. Check that the handle returns and the chain moves without catching.
Flush several times and watch the seal close on each cycle. The bowl should refill without a continuing ripple, and the tank should not start refilling again when it has been left undisturbed. Dry the floor and the supply connection with a paper towel so that any new moisture is easier to spot.
Repeat the food-coloring test if the original symptom was a quiet leak into the bowl. If color does not appear and the tank shuts off cleanly, the repair has addressed the observed leak path. If one symptom disappears but another remains—for example, overflow stops but the tank still refills by itself—return to the seal and chain checks rather than automatically replacing another part.
Common repair mistakes to avoid
- Forcing a stuck shutoff: stop if it will not move gently; a leaking or unusable valve needs attention before tank parts are removed.
- Making the chain taut: a tight chain can prevent the seal from closing and recreate the leak.
- Raising the water level to improve a flush: water flowing over the overflow keeps the tank filling and can waste water.
- Buying a generic part without checking fit: confirm the toilet or valve model and the replacement’s compatibility.
- Replacing several parts at once: change one likely cause, test it, and then decide whether another part needs attention.
- Using tank cleaners without checking compatibility: follow product and toilet-maker instructions, especially around rubber or other flexible seals.
When should you call a plumber?
Stop the repair if the tank or bowl is cracked, the shutoff will not close, water is leaking onto the floor, the flush-valve seat is damaged, or the fill valve continues running after an appropriate adjustment. A loose toilet or water appearing around its base also needs a different diagnosis from a tank leak.
Before arranging service, note what you observed: whether the bowl water moved, whether the tank reached the overflow, whether lifting the float stopped the flow, and whether the dye test showed water entering the bowl. These details help distinguish a seal, fill-valve, or external leak without having to repeat the initial checks.
If you are also investigating water stains or dampness in a nearby wall, the steps in How to Find a Hidden Water Leak Before Opening a Wall can help you document the area before opening it. Keep the toilet troubleshooting separate from a wall leak: the tank checks above concern water inside the fixture, while moisture outside it may have another source.
Frequently Asked Questions
Why does my toilet keep running after I flush?
A seal that does not sit flat can let tank water leak into the bowl, while a high float or fill valve that does not close can send water into the overflow. Watch the water path after a flush, then use the food-coloring test if the leak is quiet.
How can I tell if the flapper is leaking?
Add a few drops of food coloring to the tank and wait without flushing. Color appearing in the bowl shows that water is passing from the tank into the bowl; inspect the flapper or canister seal and its seating surface.
Should I replace the flapper or the fill valve first?
Choose based on what you observe. A dye-test result or a ripple in the bowl points first to the seal, while water entering the overflow points to the float or fill valve.
Can I fix a running toilet myself?
A chain adjustment, a float adjustment, or a compatible seal replacement may be manageable when the shutoff works and the tank parts are accessible. Stop if the porcelain is cracked, the shutoff leaks or will not close, or water is escaping outside the tank.
How do I know whether the repair worked?
Let the tank refill, confirm that water stops below the overflow, and flush several times while watching the seal and chain. A quiet tank, a still bowl, and a dry floor and supply connection are signs that the observed problem has stopped.
Key points to remember
- Watch the water after a flush before choosing a replacement part.
- Check the seal and chain for bowl leaks; check the float and fill valve for overflow.
- Use parts matched to the toilet model and test the repair through repeated flushes.
- Leave cracked fixtures, failed shutoffs, base leaks, and damaged valve seats for a broader repair assessment.
Toilet models and replacement components differ, and product instructions determine the correct service method. For a part-specific procedure, use the manufacturer’s instructions for the toilet or valve model identified inside the tank.
References
- Fix a Running Toilet: Expert Q&A & Troubleshooting Guide
- How to Fix a Running Toilet in the UK: Stop Water Waste | BookaBuilderUK.com
- 6 Steps to Fix a Running Toilet — Before It Wastes ...
- Toilet Repair: Diagnosing and Fixing Common Failures
- How to Detect a Leaky Toilet | Corinth, TX
- Residential Toilets | US EPA
Information in this post was checked as of September 2026. Policies and prices may change, so please verify important details with official sources.
Comments
Post a Comment